
Would you like to create a new Administrator account for your WordPress website without using the dashboard?
Have you forgotten your WordPress login details and locked yourself out of your site?
Did another WordPress user delete your account or change its email address?
Or worse, have you been hacked and lost access to your WordPress admin dashboard?
If you have, you know how frustrating and scary it can be to get locked out of your website.
Don’t worry… There is a way to regain control of your WordPress site by adding an admin user using FTP without access to your WordPress dashboard or database or resetting your password via email.
Please note, that if you just want to change your account username, our team at WordPress Made Easy has published a step-by-step guide on how to change your WordPress admin username with ease.
In this guide, we’ll show you how to add an admin user in WordPress using FTP. This will allow you to create a new user with administrator privileges, which you can use to log in to your WordPress site and fix any issues that might be preventing you from accessing your website’s dashboard.
We will also show you how to delete the code snippet that creates the new user, as leaving it on your site can pose a security risk.
This is a simple and effective solution that can save you a lot of time and hassle. All you need is an FTP client, your FTP credentials, and a few minutes of your time.
Ready to get started? Let’s go!
How to use FTP to Add a New WordPress Admin Account
The method we will use today relies on adding a new WordPress admin user programmatically by adding a PHP code snippet to the functions.php file of your current WordPress theme.
If you wish, you can also use other ways to execute PHP code within WordPress other than adding it to the functions.php file.
To be able to edit the functions.php file of your site’s WordPress theme, you will need to have FTP access to your WordPress hosting or you can use the file manager of your hosting control panel (if it has one!).
What is FTP?
FTP, which stands for File Transfer Protocol is a method of transferring files between computers and other devices on the internet.
Since your website is hosted on a web server which is a special type of computer, we will be using FTP to connect your computer to the web server that hosts your WordPress site files and upload the updated functions.php file to it.
What do you need to create the WP Admin Account via FTP?
As we noted above, you will create the WordPress admin user account by running a PHP code snippet on your website. That requires the ability to upload that code to your website’s files.
So, you need to have the following:
- An FTP client – a software that allows you to use the FTP protocol to access your site files. (we will be using the free, open-source FileZilla).
- A Text Editor that we will use to edit the functions.php file and add the code snippet to it. (Your OS’s text editor will be enough, e.g. Notepad).
- An FTP account that has sufficient permissions to edit files on your web hosting service.
- A web browser, of course, which is already secured, as you are reading this guide on WordPress Made Easy. 🙂
Please be aware that if you use the online File Manager provided by your web hosting control panel, you won’t require an FTP client, FTP access, or a text editor, provided the file manager includes an online text/code editor.
Also, it’s important to be aware that the free and cheaper WordPress.com plans currently do not include FTP access, as highlighted in our comparison of WordPress.com and WordPress.org. Therefore, this guide will not be applicable if you are using those plans.
If you possess the necessary tools and permissions, let’s begin the work.
Adding a WordPress Admin Account with FTP
To add the account, please follow these steps.
1. Connect to your WordPress site with FTP
Utilize your FTP client to connect to the FTP server of your web host using your FTP account credentials. The instructions vary between different FTP clients, and you can find them in the help guides specific to your FTP client.
If you use FileZilla, WP-ME.com has a guide on how to use FileZilla to connect to your FTP server.
2. Locate & Download the functions.php file
After you successfully connect to your web host and can see your website’s files, it is now time to locate the desired functions.php file of your current WordPress theme.
How to know which WordPress theme you are currently using?
If you’re unsure about the active theme on your website, there’s a straightforward method to determine your current WordPress theme:
- Go to any page on your website (the homepage for example).
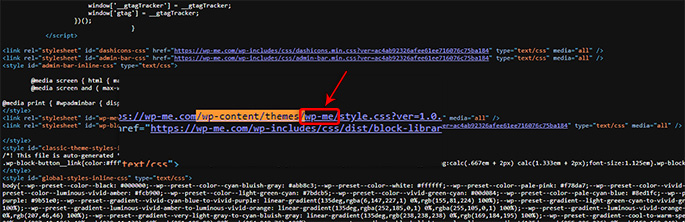
- Right-click anywhere on the page and select View page source from the context menu.
- Click CTRL + F (or ⌘ + F on MAC) to open the finder tool and search for
/wp-content/themes/. - You’ll notice the directory name of your current theme follows immediately after. For instance, if you’re using the default WordPress Twenty Twenty-Four theme, the path would be
wp-content/themes/twentytwentyfour/.
Now that you have identified the name of your current theme’s folder on the server, you need to find the functions.php file within it. This is where you will insert the code to create the new WordPress admin user.
In your FTP client, go to this path:/public_html/wp-content/themes/your-theme/
Where your-theme is the name of your themes folder e.g. twentytwentyfour or wp-me in the case of WP-ME.com’s current theme.
Once you are in the theme’s folder, locate the functions.php file on the right side of FileZilla’s window.

Now, download the file to your computer by double-clicking on it or right-click and choose Download. After that, locate the downloaded file on your PC and open it with any plain text editor like Notepad.
3. Add this PHP Code Snippet to the file
After you open the file for editing in the text editor, add this PHP code to the end of the file after replacing your_username, your_password and [email protected] with your own values:
/**
 * Create New WordPress Admin User
 * Source: https://wp-me.com/add-wordpress-admin-user-ftp/
 */
function wpme_add_admin_user() {
    // New account info
    $username = 'your_username';
    $password = 'your_password';
    $email = '[email protected]';

    // Don't change this
    if (!username_exists($username) && !email_exists($email)) {
        $new_user_id = wp_create_user($username, $password, $email);
        $user = new WP_User($new_user_id);
        $user->set_role('administrator');
    }
}
add_action('init', 'wpme_add_admin_user');
So, what does this PHP code do?
If you’re curious about the function of this WordPress code snippet, here is what it does:
- This PHP function verifies whether the chosen username or email is already associated with a user on your site. If they are not, the process moves forward; otherwise, no modifications are made.
- Should there be no existing user with the specified username and email, a new WordPress user account will be established using the given credentials.
- Once the account is created, it will be assigned the role of Administrator.
After appending the code snippet to the bottom of the functions.php file, this is how the file should look like this: (note that we have used random values for the account information).

4. Reupload the Updated WordPress Theme functions.php file
After editing and saving the file, the next step is to re-upload it to your web host and replace the existing file with the new one. That ensures our code snippet is executed to create a new WordPress admin user account.
Navigate back to the FTP client and locate the locally edited functions.php file on the left side of the interface. Make sure that the right side of the interface is showing the original functions.php file from the server.
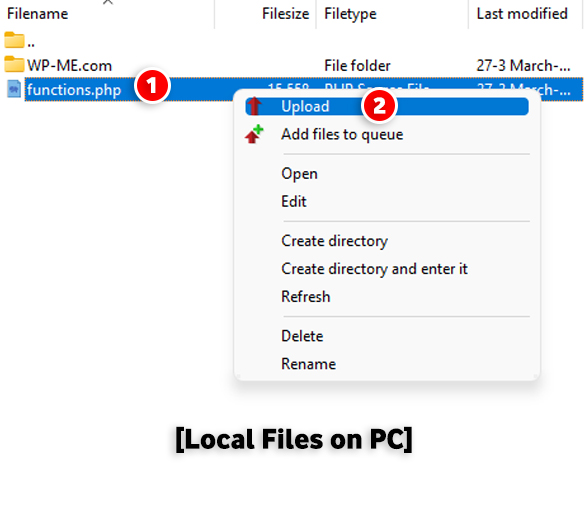
Now, right-click the local file and choose Upload.
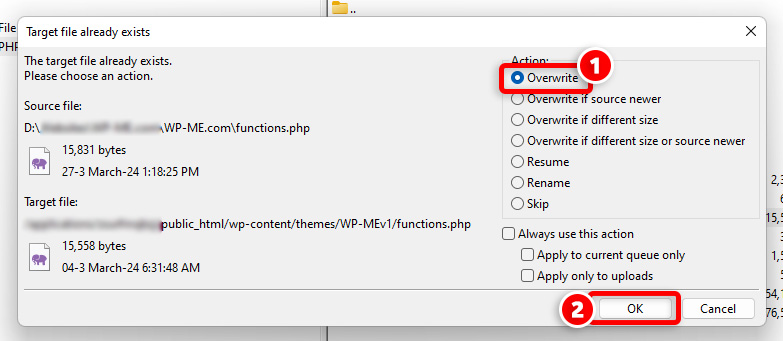
A popup window should appear now indicating the target file already exists on the server. Select Overwrite and then click OK.
5. log in to your WordPress Dashboard using the new Admin User
You should now attempt to log in to your WordPress blog with the new WordPress admin account that is supposed to be created with the provided code snippet.
Log in to your WordPress website as usual. You can use this URL to access the dashboard: https://example.com/wp-admin/ after replacing example.com with your WordPress site URL.
In the login form, enter the username and password you specified in the code you added to the functions.php file and you should be able to log in.
I can’t log in using the new WordPress admin account!
If you’re unable to log in, ensure that you’ve followed the steps above and are using the same credentials that you entered into the code snippet.
If you still can’t log in, download and open the functions.php file from your server to verify the presence of the WordPress admin user creation code snippet.
If it’s missing, attempt the steps once more. Should the snippet still fail to appear in the file, check what is preventing the uploaded file from replacing the one on the server (might be file permissions) or consider contacting your web hosting provider.
6. Delete the code snippet
Now that the new Admin user has been successfully created on your WordPress site, there is no need to keep the PHP code snippet in the functions.php file.
Repeat the steps you followed to download and edit the functions.php file, but this time, remove the snippet you previously added, save the file, and then re-upload it again to your server.
We trust that this WordPress guide has made it simple for you to add a new admin user account to your WordPress site, allowing you to regain access to your website effortlessly.
If you have any questions, the WordPress Made Easy team is always here to assist you. Simply leave us a comment below, and we’ll respond ASAP!
Hello,
It worked for me.
Thanks a lot.
Hi Henry,
Glad it worked for you.